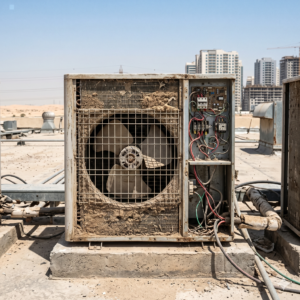
AC strainer cleaning is a critical maintenance task that protects pumps, heat exchangers, and cooling performance—especially in marine and chilled-water systems. Many users confuse strainers with simple air filters, but improper cleaning can cause flooding, air locks, pump damage, or system failure. This guide explains exactly what an AC strainer is, where it sits in the system, how to clean it safely, and how to prevent recurring flow problems.
Table of Contents
ToggleUnderstanding What an AC Strainer Really Is
Before starting any cleaning process, it is essential to clarify what “AC strainer” means. In many residential homes, people think of air filters when discussing AC cleaning. However, in marine and chilled-water systems, a strainer is completely different.
Marine or chilled-water basket strainers are mechanical filtration components installed in the water intake line. Their job is to prevent debris such as seaweed, sand, shells, sediment, or mineral particles from entering the pump and heat exchanger.
In contrast, standard residential air filters trap dust from air before it enters the indoor unit. They protect airflow and air quality, not water pumps.
This distinction matters because cleaning procedures, safety precautions, and risks are very different. Air filter cleaning is simple and low-risk. Strainer cleaning involves water pressure, valves, sealing rings, and pump protection. Handling it incorrectly can cause flooding or pump damage.
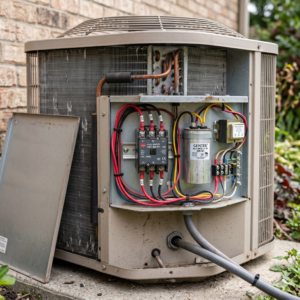
Where the AC Strainer Is Physically Located
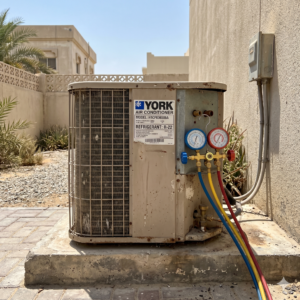
In marine or chilled-water cooling systems, the strainer is installed between the intake source and the pump. Its exact physical location typically follows this sequence:
- Water intake through-hull or intake pipe
- Intake shut-off valve
- Strainer housing (clear or metal body with removable cap)
- Pump
- Heat exchanger
This placement is critical. The strainer must protect the pump from debris. If the strainer clogs, water flow to the pump decreases, leading to overheating or shutdown. If the housing is opened without closing the intake valve, water can rush in immediately.
Understanding this layout helps prevent one of the most common accidents: opening the strainer cap while water intake is still active.
Safety-First Warnings Before Cleaning
AC strainer cleaning is not complicated, but it requires strict safety discipline. Ignoring proper sequence can lead to flooding or equipment damage.
Before opening the strainer housing:
- Turn off the AC system completely.
- Switch off the pump power at the breaker panel.
- Close the water intake valve fully.
Never open the strainer cap before closing the intake valve. In marine systems especially, water pressure from outside can force water into the compartment immediately.
After reassembly, proper priming is necessary. If air remains trapped in the line, the pump may run dry, creating an air lock. Dry running can overheat and permanently damage the pump.
Air lock is one of the most overlooked risks after strainer cleaning.
Required Tools and Materials
Using the correct tools makes the process safer and prevents damage to components. Avoid improvising with sharp or oversized tools.
- Soft-bristle brush – for safe mesh cleaning without tearing.
- Bucket or container – to catch residual water.
- Clean freshwater supply – for rinsing debris.
- Silicone grease (marine-safe) – for O-ring lubrication.
- Spare O-ring or gasket – recommended to have on hand.
- Adjustable wrench (if required) – used carefully to avoid over-tightening.
Do not use wire brushes or metal scrapers on mesh baskets. They can deform the screen and reduce filtration effectiveness.
Step-by-Step AC Strainer Cleaning Flow
Step 1: Power Down Equipment
Shut down the AC system completely. Confirm the pump is not running. This eliminates suction pressure and reduces risk.
Step 2: Close the Water Intake Valve
Locate the intake shut-off valve before the strainer housing. Turn it fully closed. Confirm the handle position visually.
Step 3: Relieve Residual Pressure
Some systems retain internal pressure. Slowly loosen the cap slightly to release trapped pressure before fully opening.
Step 4: Open the Housing Carefully
Unscrew the cap or clear lid gently. Avoid dropping or damaging the sealing O-ring. Keep it clean and inspect it immediately.
Step 5: Remove the Basket
Pull the strainer basket straight out. Observe the type of debris present—sand, seaweed, shells, mineral flakes. This helps diagnose environmental exposure.
Step 6: Clean Using Safe Brushing Methods
Rinse with freshwater. Use a soft-bristle brush to remove stubborn debris. Brush in the direction of the mesh weave to avoid stretching or tearing.
If mineral buildup is present, soak briefly in diluted vinegar or manufacturer-approved descaling solution. Rinse thoroughly afterward.
Step 7: Inspect for Damage
Check for:
- Corrosion spots
- Cracked mesh
- Warped basket shape
- Damaged O-ring
Replace components if structural damage is found. Even small cracks can allow debris to pass into the pump.
Step 8: Reassemble Carefully
Lubricate the O-ring lightly with silicone grease. Seat the basket properly. Tighten the cap evenly—firm but not over-tightened.
Step 9: Reopen Valve and Prime System
Slowly reopen the intake valve. Allow water to fill the housing before restarting the pump.
Confirm full water flow before powering the AC system back on.
Troubleshooting After Cleaning
No Water Flow
Possible causes:
- Intake valve not reopened
- Air lock in pump
- Severe intake blockage outside hull
Solution: Reprime pump and confirm intake path is clear.
Leaking Cap
Likely reasons:
- Misaligned O-ring
- Damaged gasket
- Debris on sealing surface
Improper Sealing
Check O-ring seating and ensure no twisting occurred during tightening.
Air Pockets
If the pump runs but no water circulates, trapped air may be present. Bleed air if system design allows.
Mineral or Marine Buildup
For heavy marine exposure, soaking in mild descaling solution may be required. Avoid harsh acids.
Maintenance Frequency Guidelines
Cleaning frequency depends heavily on environmental conditions.
- Clear water environments: Inspect every 1–2 months.
- Harbor exposure: Inspect monthly due to algae and debris.
- After storms: Immediate inspection due to sediment spikes.
Systems operating in high-sediment or marine environments require more frequent checks to prevent overheating.
Pro-Level Handling Tips
- Keep spare O-rings on board or onsite.
- Never overtighten housing caps.
- Document cleaning intervals.
- Monitor pump sound after restart.
When Professional Support Is Recommended
If repeated clogging occurs, leaks persist after proper sealing, or pump overheating continues despite cleaning, professional inspection may be necessary. Persistent problems could indicate intake obstruction, heat exchanger scaling, or pump wear beyond routine cleaning.
Conclusion
AC strainer cleaning is a hands-on maintenance task that directly protects your pump and cooling performance. Understanding system layout, following strict safety procedures, and cleaning with the correct tools prevents flooding, air locks, and equipment damage. Regular inspection based on environmental conditions ensures reliable water flow and stable operation. With proper technique and preventive discipline, you reduce downtime, avoid costly pump failures, and maintain consistent cooling performance.