Searching for how to change AC switch often starts with confusion, not confidence. Many people are unsure which switch is actually causing the problem, whether it is safe to touch, or if replacing it could damage the AC system. This guide is written to remove that uncertainty by helping you identify the correct switch, understand safety boundaries, and decide when a careful DIY approach is reasonable and when professional help is the safer option.
Table of Contents
ToggleStart by Identifying Which AC Switch You Mean
The phrase “AC switch” does not refer to a single component. This is one of the biggest pain points for users. AC systems use several different switches, each with a different function, voltage level, and risk profile. Before touching anything, you must identify which switch is involved.
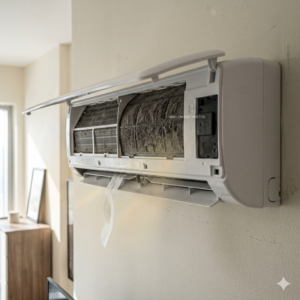
Wall Thermostat or Wall Control Switch
This is the most common switch people think about. It may be a traditional thermostat, a digital controller, or a simple on-off wall switch that controls cooling mode.
Typical signs this switch may be the issue include:
- AC does not respond when settings are changed
- Display is blank or unresponsive
- Buttons or dial feel loose or inconsistent
These switches usually operate at low voltage and are often the safest type for basic DIY replacement, provided power is fully isolated.
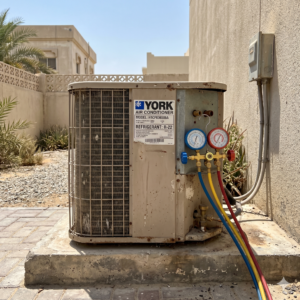
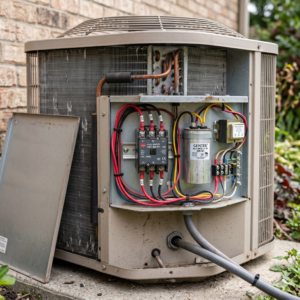
Outdoor Disconnect Switch
This switch is usually installed near the outdoor condenser unit. Its purpose is safety: it allows technicians to cut power locally when servicing the AC.
Key characteristics:
- Located outside near the condenser
- Controls high voltage power
- May use a pull-out handle or lever
This switch carries higher risk because it deals with mains voltage. Mistakes here can cause serious damage or injury.
Float Switch (Condensate Safety Switch)
This is a safety switch connected to the drain pan or condensate line. It turns off the AC when water builds up, preventing overflow damage.
Symptoms linked to a float switch include:
- AC suddenly stops even though settings are correct
- System shuts down after long run times
- Water visible near indoor unit
Replacing a float switch requires understanding drainage layout and correct wiring orientation.
Selector Switch or Mode Switch
Some older systems or control panels use selector switches to change between modes (cool, fan, off).
Failure signs include:
- AC works only in certain modes
- Switch does not “click” firmly
- System behaves unpredictably
These switches vary widely by model, so correct identification is critical.
Safety First Before You Touch Any AC Switch
Safety is not optional when learning how to change AC switch. Most mistakes happen not because of lack of skill, but because steps are rushed or skipped.
Shut Off Power at the Main Breaker
Always turn off power at the circuit breaker, not just at the wall switch. AC systems often have multiple power paths, and relying on one switch is unsafe.
Verify There Is No Live Voltage
Use a voltage tester or multimeter to confirm there is no electricity present. Never assume power is off just because the breaker is switched.
Document Wiring Before Removal
Take clear photos of the wiring from multiple angles. Label wires if needed. This single step prevents most reinstallation mistakes.
Documenting wiring is especially important for outdoor disconnects and selector switches, where terminals may look similar.
Tools and Parts Checklist Before You Begin
Preparation reduces stress and errors. Before starting, gather all tools and confirm part compatibility.
Basic Tools You May Need
- Insulated screwdriver set
- Voltage tester or multimeter
- Wire labels or masking tape
- Camera or phone for documentation
Choosing the Correct Replacement Switch
The replacement switch must match:
- Voltage rating
- Amperage rating
- Number of terminals
- Mounting type
Using an incompatible switch can lead to overheating, short circuits, or system failure. Prices vary depending on switch type and brand, so it is best to confirm the correct specification first, then check pricing from reliable suppliers.
Step-by-Step Anatomy of Replacing an AC Switch
The steps below outline the general process. The exact details may vary depending on the switch type, but the sequence remains consistent.
Step 1 Access the Switch Safely
Remove the cover plate or housing carefully. Do not force panels open. If screws resist, stop and reassess.
Step 2 Label and Document All Wires
Even if wires seem obvious, label them. Wire colors are not always consistent across systems.
Step 3 Disconnect the Terminals
Loosen terminal screws gently and remove wires one at a time. Avoid bending or damaging the conductors.
Step 4 Remove the Old Switch
Once wires are free, remove mounting screws and take out the old switch. Compare it physically with the replacement to confirm compatibility.
Step 5 Install the New Switch
Mount the new switch securely. Reconnect wires according to your documentation. Tighten terminals firmly but do not over-tighten.
Step 6 Restore Power in the Correct Order
Replace covers first. Then restore power at the breaker. Finally, test the switch function.
What to Do If the AC Still Does Not Work
Sometimes replacing the switch does not immediately solve the issue. This does not always mean the switch was installed incorrectly.
Check Breakers and Fuses
A tripped breaker or blown fuse may still be interrupting power.
Inspect Related Components
Some switches interact with sensors, relays, or control boards. A faulty component elsewhere can mimic switch failure.
Recheck Wiring Against Documentation
Compare your wiring photos to the current setup. Small misplacements can stop the system from responding.
Comparing Wall Switches and Outdoor Disconnects
| Aspect | Wall Switch / Thermostat | Outdoor Disconnect |
|---|---|---|
| Voltage Level | Low voltage | High voltage |
| DIY Difficulty | Low to moderate | High |
| Risk Level | Lower if power is off | Significant if mishandled |
| Common Mistakes | Mislabeling wires | Incorrect isolation of power |
This comparison helps you judge your limits honestly. Many users can safely replace a wall control switch but should avoid outdoor disconnect work without professional training.
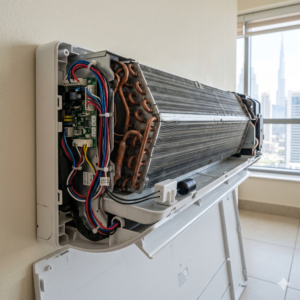
The Role of Visual Guidance in Reducing Errors
One of the most effective ways to reduce mistakes when learning how to change AC switch is using visual guidance.
Annotated photos help by:
- Clarifying wire positions
- Showing correct terminal orientation
- Reducing reliance on memory
If you feel unsure at any step, pause and compare your setup with clear reference images. Confidence should come from clarity, not speed.
When DIY Is No Longer the Best Choice
DIY can be empowering, but there are limits. Stop and consider professional help if:
- The switch involves high voltage components
- Wiring does not match documentation
- The system behaves unpredictably after replacement
- You smell burning or hear unusual sounds
In these cases, professional inspection helps prevent system damage, electrical hazards, and higher repair costs later.
When AC Switch Issues Should Be Handled Properly
AC switch problems often seem small, but ignoring them or handling them incorrectly can lead to system shutdowns, electrical damage, or safety risks. Bio On Air supports safe and accurate AC diagnostics, from control-related issues to deeper electrical concerns, with a focus on clarity and prevention rather than rushed fixes. If you are unsure whether your switch issue is safe to handle or linked to a larger AC problem, using the WhatsApp or Call button at the top right of this page allows you to discuss the situation before taking unnecessary risks.
Conclusion
Understanding how to change AC switch starts with identifying the correct switch, respecting safety boundaries, and following a structured process. Not all AC switches are the same, and confusing a low-voltage wall control with a high-voltage disconnect can be dangerous.
By isolating power correctly, documenting wiring, using compatible parts, and restoring power carefully, some switch replacements can be handled safely. However, knowing when to stop is just as important as knowing how to start. When uncertainty arises, seeking expert guidance protects both your AC system and your safety. A careful, informed approach always costs less than fixing preventable mistakes.