Searching for ac change filter usually means your AC airflow feels weaker, the air does not feel as clean as before, or you simply want to avoid bigger problems before they start. Changing an AC filter may look like a small task, but it plays a critical role in cooling performance, energy efficiency, and indoor air quality. Done correctly, it helps your system breathe properly and protects expensive components. Done incorrectly or too late, it can quietly increase electricity use, strain the system, and shorten the lifespan of your AC.
Table of Contents
ToggleWhy AC Change Filter Is Not a Small or Optional Task
Many people underestimate the impact of a dirty or incorrect AC filter. The filter is the first line of defense between your living space and the internal parts of the AC system. Its job is to trap dust, debris, and airborne particles before they reach the coil, blower, and ductwork.
When the filter is clogged, several things happen at the same time:
- Airflow is restricted, so cool air struggles to circulate.
- The system works harder and runs longer to reach the same temperature.
- Electricity consumption increases without obvious improvement in comfort.
- Internal components experience extra strain.
Over time, this strain can lead to performance issues that feel sudden but actually developed slowly. Regular AC change filter habits are one of the simplest ways to avoid unnecessary stress on your system and protect indoor air quality.
Step-by-Step AC Change Filter Flow (Do This in Order)
Changing an AC filter is straightforward, but doing it in the correct order matters for safety and effectiveness. Below is a clear step-by-step flow you can follow.
Step 1 Shut Down the System at the Thermostat
Before touching anything, turn the AC system off using the thermostat. This prevents the blower from running while the filter is removed and avoids pulling loose dust into the system.
Do not rely only on switching off the remote or wall unit. Make sure the system is fully stopped so there is no airflow during the replacement.
Step 2 Locate the Filter Slot or Return Air Intake
The filter location depends on your AC type. Common locations include:
- Behind a return air grille on the wall or ceiling
- Inside the indoor unit (for split systems)
- Inside the air handler cabinet
If you are unsure, look for a removable panel or grille where air is drawn into the system. This is usually where the filter sits.
Step 3 Remove the Old Filter Carefully
Slide the old filter out slowly to avoid shaking loose dust into the air. If the filter is very dirty, hold it flat while removing it.
Take a moment to observe how dirty it is. This visual check will help you judge whether your replacement frequency is appropriate.
Step 4 Identify the Airflow Direction Arrow
Every proper AC filter has an arrow printed on the frame. This arrow shows the direction of airflow and must point toward the AC unit, not toward the room.
Installing the filter backward reduces efficiency and can cause dust to bypass the filter entirely. This is one of the most common mistakes during AC change filter tasks.
Step 5 Install the New Filter Correctly
Slide the new filter into the slot, making sure it fits snugly without bending. The airflow arrow should face the same direction the old filter was facing.
If the filter feels loose, tight, or forced, stop and recheck the size.
Step 6 Close the Panel and Restart the System
Once the filter is in place, secure the panel or grille properly. Turn the system back on at the thermostat and let it run for a few minutes.
You should notice smoother airflow and more consistent cooling shortly after replacement.
How to Find the Correct AC Filter Size
Using the correct filter size is just as important as replacing it regularly. An incorrect size can allow unfiltered air to bypass the filter or restrict airflow.
Check the Label on the Old Filter
The easiest way to find the correct size is to look at the old filter. Most filters have the size printed on the frame, usually in this format:
Width × Height × Thickness
For example: 16 × 25 × 1.
Measure the Intake Frame If the Label Is Missing
If the label is unreadable or missing, measure the filter slot or intake frame using a measuring tape. Measure:
- Width
- Height
- Thickness
Measure to the nearest millimeter or inch for accuracy.
Actual Size vs Nominal Size Explained
This is a common point of confusion. Filter packaging usually lists the nominal size, which is a rounded number. The actual size is slightly smaller.
For example:
- Nominal size: 16 × 25 × 1
- Actual size: approximately 15.5 × 24.5 × 0.75
This difference allows the filter to slide into the slot properly. Always buy based on the nominal size listed for your system.
Understanding MERV Ratings Without Overcomplicating It
MERV (Minimum Efficiency Reporting Value) ratings describe how effectively a filter captures particles. Higher is not always better for every system.
Low MERV (1–4)
Basic protection. Captures large dust particles but offers minimal air quality improvement.
Best for systems with limited airflow capacity.
Medium MERV (5–8)
Good balance for most residential systems. Captures dust, pollen, and common household particles.
This range is often recommended for standard home use.
High MERV (9–13)
Higher filtration efficiency. Captures finer particles and allergens.
However, higher resistance can restrict airflow on systems not designed for it.
Important Warning About Airflow Restriction
Installing a high-MERV filter in a system not designed for it can:
- Reduce airflow
- Increase system strain
- Cause the AC to work harder and longer
Always balance filtration level with system capability. When in doubt, choose a moderate MERV rating.
Why Regular AC Change Filter Matters More Than You Think
Skipping filter changes does not usually cause immediate failure. Instead, problems build quietly over time.
Dirty filters can lead to:
- Higher energy consumption due to restricted airflow
- Reduced cooling performance
- Excess strain on fans and motors
- Increased risk of expensive component damage
These issues often show up later as performance complaints or repair needs. The cost is usually much higher than the effort required to change a filter on time.
How Often Should You Change Your AC Filter (Based on Real Conditions)
There is no single schedule that fits everyone. Replacement frequency depends on how your space is used.
High Occupancy Homes
Homes with many occupants produce more dust and airborne particles. Filters may need changing more frequently.
Homes With Pets
Pet hair and dander can clog filters quickly. Visual checks should be done often.
Allergy-Sensitive Environments
If allergies are a concern, maintaining clean filters becomes even more important for comfort.
Infrequent AC Use
Systems used less often may not need frequent changes, but filters should still be checked regularly.
The best approach is not relying on a calendar alone, but combining time-based checks with visual inspection.
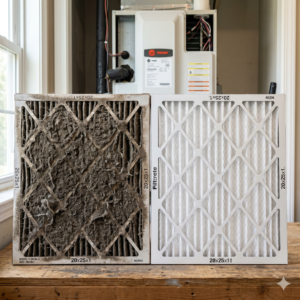
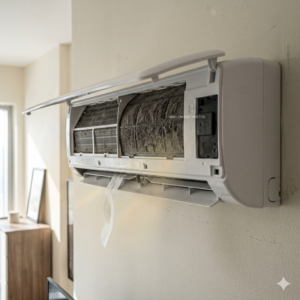
Visual Self-Check Method to Decide If Replacement Is Needed
A simple visual check can help you decide whether an immediate AC change filter is needed.
Hold the filter up to a light source:
- If light passes through easily, the filter is still usable.
- If light is blocked or the filter looks gray or clogged, replacement is recommended.
Also check for:
- Dust buildup along the edges
- Uneven discoloration
- Visible debris stuck in the fibers
This method helps prevent both premature replacement and overdue neglect.
Common Mistakes to Avoid During AC Change Filter
Even simple tasks can go wrong if rushed.
- Installing the filter backward
- Using the wrong size
- Choosing a filter with too high resistance
- Forgetting to turn off the system
Avoiding these mistakes ensures the filter does its job without harming system performance.
When AC Change Filter Is Not Enough
If airflow remains weak, cooling is uneven, or odors persist even after replacing the filter, the issue may be deeper inside the system.
In such cases, professional inspection may be needed to check:
- Internal coils
- Drain lines
- Duct cleanliness
- System calibration
Filter replacement is preventive care, not a cure-all.
When to Get Professional Help
If you are unsure about filter selection, airflow direction, or system response after replacement, professional guidance can help prevent mistakes that lead to larger issues.
Early checks and correct filter practices reduce the risk of long-term damage and help maintain stable performance.
Conclusion
AC change filter is one of the simplest yet most impactful actions you can take to protect your cooling system. By following the correct replacement steps, choosing the right size and MERV rating, and adjusting replacement frequency based on real living conditions, you support better airflow, cleaner air, and more stable system performance.
Regular filter care reduces energy waste, minimizes system strain, and helps avoid costly problems later. When combined with periodic professional checks, it forms the foundation of responsible AC ownership—keeping your space comfortable, efficient, and healthy over the long term.