Understanding the correct split ac installation wall hole is essential for proper AC performance, water drainage, and long-term system safety. In the UAE, where humidity, dust, and extreme temperature differences are constant, even a small mistake in wall hole drilling can lead to leaks, inefficiency, and repeated service issues.
Table of Contents
ToggleWhy the Wall Hole Matters More Than You Think
Many people focus on the AC unit itself, but the wall hole is where multiple critical components pass through: refrigerant pipes, drain hose, and communication cable. If this opening is done incorrectly, it can cause:
- Water leakage back into the room
- Hot air and humidity entering the space
- Dust and pest intrusion
- Reduced cooling efficiency
- Long-term wall damage
That is why proper wall hole installation is not just a drilling task—it is part of the overall AC system design.
Standard Wall Hole Diameter for Split AC
In most residential installations across Dubai and the UAE, the standard hole size is:
- 65 mm (2.5 inches) for standard split AC units
- Up to 70–75 mm for larger capacity systems or thicker insulation
This diameter ensures that all components can pass through without compression or damage.
If the hole is too small:
- Pipes may bend or kink
- Insulation may get damaged
- Drain hose flow may be restricted
If the hole is too large:
- Sealing becomes difficult
- Air leakage increases
- Structural integrity may be affected
Correct Wall Hole Angle to Prevent Water Backflow
One of the most critical rules in split AC installation is the wall hole angle.
The hole must be drilled with a slight downward slope toward the outside:
- Recommended angle: 5° to 10° downward
This slope ensures that condensation water from the indoor unit flows naturally outward through the drain hose.
If the hole is drilled straight or upward:
- Water can flow back into the room
- Leakage stains may appear on walls
- Mold and humidity issues may develop
This is one of the most common installation mistakes in the UAE.
Dubai-Specific Pre-Drilling Checklist
1. Scan for Hidden Utilities
Before drilling, it is important to check for:
- Electrical wiring
- Water pipes
- Drainage lines
Using a detector or scanning tool helps prevent serious damage and safety risks.
2. Check Building Management Rules
Many buildings in Dubai require approval before drilling external walls, especially in:
- High-rise apartments
- Managed communities (Marina, JLT, Downtown)
Ignoring this can result in penalties or forced rework.
3. Confirm Wall Type
Different materials require different drilling techniques:
- Concrete walls
- Brick walls
- Gypsum partitions
Recommended Installation Height Guidelines
The position of the wall hole is directly related to indoor unit placement.
General guideline:
- Indoor unit height: 2.1 – 2.4 meters from floor
- Wall hole slightly below indoor unit outlet
This ensures proper gravity-based drainage and airflow alignment.
Proper Drilling Tools and Technique
Using the correct tools ensures clean and safe drilling:
- Core drill machine for precise circular cuts
- Diamond-tipped drill bit for concrete
- Dust collection or containment setup
Poor drilling technique can cause:
- Wall cracks
- Uneven hole edges
- Structural damage
Importance of PVC Sleeve Protection
After drilling, a PVC sleeve should be inserted into the hole.
Functions of PVC sleeve:
- Protect pipes from sharp edges
- Prevent insulation damage
- Allow easier future maintenance
Without a sleeve, long-term wear and tear can damage internal components.
Correct Bundling Order of AC Components
Proper arrangement of components inside the wall hole is critical.
Correct order:
- Refrigerant pipes (insulated)
- Drain hose (lowest position)
- Communication cable (separate and secured)
The drain hose must always be positioned at the lowest point to ensure proper water flow.
Best Sealing and Weatherproofing Methods
Sealing the wall hole is essential to prevent:
- Humidity infiltration
- Dust entry
- Pests and insects
Recommended sealing methods:
- PU foam (polyurethane foam)
- Silicone sealant
- Cement finishing (for exterior)
Good sealing ensures both insulation and hygiene.
Interior and Exterior Finishing Techniques
Interior Finish
- Use decorative wall caps
- Ensure clean and flush finish
- Avoid visible gaps
Exterior Finish
- Apply weather-resistant sealant
- Protect against UV and rain exposure
- Ensure proper slope remains intact
Common Problems Caused by Poor Wall Hole Installation
1. Water Leakage Inside Room
Usually caused by incorrect slope or blocked drain hose.
2. Hot Air Entering the Room
Caused by improper sealing or oversized hole.
3. Pest and Insect Entry
Gaps around pipes can become entry points.
4. AC Performance Issues
Improper pipe routing can affect cooling efficiency.
How to Troubleshoot Wall Hole Issues
- Check if the drain hose slopes downward
- Inspect sealing gaps inside and outside
- Look for visible water stains or dampness
- Ensure pipes are not bent or compressed
Early detection can prevent more serious damage.
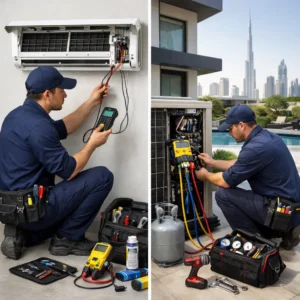
When You Need Professional Installation Support
While drilling a wall hole may seem simple, it requires precision and understanding of AC systems.
Professional installation ensures:
- Correct angle and diameter
- Safe drilling without damaging utilities
- Proper sealing and finishing
- Long-term system performance
Understanding proper AC installation practices helps ensure that every component, including the wall hole, supports efficient operation.
Why Proper Installation Prevents Future Costs
Many long-term AC issues are not caused by the unit itself, but by improper installation.
Incorrect wall hole setup can lead to:
- Repeated leakage repair costs
- Increased energy consumption
- Premature component damage
Fixing installation mistakes later is often more expensive than doing it correctly from the start.
Final Thoughts Before Installation
Before drilling, always ensure:
- Correct measurement and positioning
- Utility scanning completed
- Proper tools are available
- Installation plan is clear
If you are planning a new installation or experiencing issues like water leakage, air gaps, or poor cooling, it is important to address the root cause early. Improper wall hole installation can lead to hidden damage, reduced AC efficiency, and indoor air quality issues over time. With the right approach, these problems can be prevented or corrected effectively. If you need guidance or want to ensure everything is done correctly, you can use the WhatsApp or Call button on the top right to connect with the Bio On Air team and discuss your situation directly.
Conclusion
The split ac installation wall hole is a small detail with a major impact. Correct diameter, proper slope, and effective sealing ensure reliable AC performance, prevent water leakage, and protect indoor air quality. Paying attention to this step can save you from costly repairs and long-term issues.