Duct cleaning tools are often misunderstood. Many people assume that any brush or vacuum can clean air ducts properly, while others believe only expensive industrial machines work. The reality sits in between. The right tools depend on who is using them, what type of duct system is involved, and how deep the contamination is. This guide breaks down duct cleaning tools by user type, explains which tools are essential versus optional, compares cleaning effectiveness by method, highlights safety and damage risks, and shows how to verify results so you know whether cleaning actually worked.
Table of Contents
ToggleUnderstanding Who Uses Duct Cleaning Tools
Before discussing specific tools, it is important to understand who they are designed for. Duct cleaning tools generally fall into two main user categories: DIY homeowners and entry-level professionals. Mixing these categories often leads to wasted money or damaged ductwork.
DIY Homeowner Use
Homeowners usually deal with light contamination such as dust buildup near vents, visible debris close to registers, or airflow issues caused by neglected filters. Their goal is basic hygiene and airflow improvement, not full system restoration.
DIY tools are typically:
- Lower power and lower cost
- Designed for short reach and simple operation
- Suitable for metal ducts only if used gently
They are not meant to clean deep trunk lines or heavily contaminated systems.
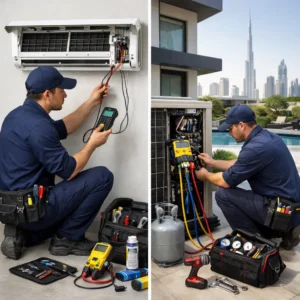
Entry-Level Professional Use
Entry-level professional tools are designed for technicians who clean ducts regularly but may not operate large truck-mounted systems. These tools balance power, control, and portability.
Professional-level tools usually:
- Reach deeper into duct runs
- Provide stronger agitation and suction
- Include inspection and verification equipment
Understanding this distinction prevents homeowners from buying tools that are too aggressive and professionals from under-equipping themselves.
Essential Versus Nice-to-Have Duct Cleaning Tools
Not every tool marketed for duct cleaning is necessary. Some are essential for effective cleaning, while others simply make the job faster or easier.
Must-Have Tools
These tools form the minimum effective kit for safe and meaningful duct cleaning.
- Mechanical agitators: brushes or whips used to dislodge dust and debris.
- Vacuum system with proper filtration: captures loosened contaminants instead of redistributing them.
- Basic inspection device: allows visual confirmation before and after cleaning.
Without these three elements, cleaning is often superficial.
Nice-to-Have Tools
These tools improve efficiency, coverage, or verification but are not strictly required for every job.
- Drill-powered brush systems
- Pneumatic air whips
- Advanced camera inspection systems
- Fogging or misting equipment for sanitizing
These are best added once basic cleaning capability is already reliable.
Mechanical Agitators: The Core of Duct Cleaning Tools
Mechanical agitation is what actually removes debris from duct surfaces. Without it, vacuuming alone cannot break loose adhered dust.
Manual Brushes
Manual duct brushes are simple rods with nylon or soft bristles. They are best suited for:
- Short duct runs
- Light dust buildup
- DIY homeowners with metal ducts
Effort level: High
Cleaning depth: Shallow
Risk level: Low if used carefully
Manual brushes require physical effort and patience. They are ineffective for compacted debris or long horizontal runs.
Drill-Powered Brush Systems
Drill-powered systems use rotating brushes attached to flexible rods. These are commonly used by entry-level professionals.
Effort level: Medium
Cleaning depth: Moderate
Risk level: Medium if speed is not controlled
These tools are effective for residential ducts when used at controlled speeds. Excessive rotation can damage flexible ducts or internal liners.
Pneumatic Agitators
Pneumatic whips use compressed air to strike duct walls and dislodge debris. They are powerful but require experience.
Effort level: Low
Cleaning depth: Deep
Risk level: High if misused
These tools are usually reserved for professional applications and should never be used in fragile duct systems.
Vacuum Systems and Filtration: Where Debris Goes Matters
Dislodging dust is only half the process. The other half is capturing it safely.
Shop Vacuums
Standard shop vacuums are often used in DIY setups. They can work for:
- Short sections near vents
- Loose debris only
Without proper filtration, fine particles can be blown back into the home.
HEPA-Filtered Portable Vacuums
Entry-level professional setups often use portable vacuums with HEPA filters.
Advantages include:
- Better containment of fine dust
- Safer indoor operation
- Improved air quality after cleaning
This level of filtration is critical when dealing with allergens or fine particulate matter.
Inspection Devices: Verifying Results Instead of Guessing
Inspection tools are often overlooked but are essential for quality control.
Basic Inspection Cameras
Affordable borescopes allow visual inspection inside ducts.
They help you:
- Identify contamination before cleaning
- Confirm debris removal afterward
- Document results for accountability
Advanced Inspection Systems
Professional systems include flexible cameras with lighting and recording capability.
These tools are valuable for:
- Large systems
- Commercial properties
- Quality assurance reporting
Verification builds trust and prevents disputes about whether cleaning actually occurred.
Effectiveness Comparison by Tool Type
| Tool Type | Effort Required | Cleaning Depth | Best Use Case |
|---|---|---|---|
| Manual brushes | High | Shallow | DIY, light dust near vents |
| Drill-powered systems | Medium | Moderate | Residential full-duct cleaning |
| Pneumatic tools | Low | Deep | Professional heavy contamination |
This comparison helps users choose tools based on realistic needs rather than marketing claims.
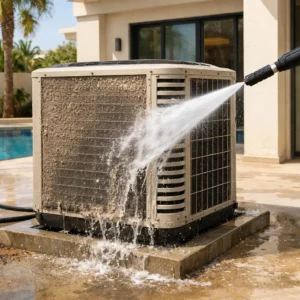
Safety and Damage Prevention When Using Duct Cleaning Tools
One of the biggest risks in duct cleaning is damaging the duct itself.
Duct Material Risks
Different duct materials require different approaches:
- Metal ducts: Most durable, but still vulnerable to aggressive tools.
- Flexible ducts: Easily torn or collapsed by rotating tools.
- Fiberglass-lined ducts: Surface damage can release fibers into airflow.
Debris Direction Strategy
Effective cleaning requires moving debris toward the vacuum, not deeper into the system. Common mistakes include:
- Agitating without active suction
- Working in the wrong direction
- Failing to isolate sections
These mistakes often worsen contamination instead of removing it.
Consumables and Finishing Tools
Duct cleaning does not end with debris removal.
Sanitizing Methods
Sanitizing is sometimes necessary after cleaning, especially if odor or microbial growth is present.
Common options include:
- Fogging with approved disinfectants
- Targeted anti-microbial treatments
These should be used only when needed and with proper ventilation.
Sealing and Repair Materials
During cleaning, small leaks or gaps may be discovered.
Finishing materials include:
- Foil HVAC tape
- Mastic sealant
Sealing prevents recontamination and improves efficiency.
How to Confirm Cleaning Results Before and After
Verification is essential to avoid paying for incomplete work.
Before cleaning:
- Inspect ducts visually
- Document dust levels
After cleaning:
- Reinspect the same sections
- Check airflow improvement
- Confirm no loose debris remains
Professional duct cleaning services typically provide visual proof as part of quality control. This approach is also used in structured AC duct cleaning services, where verification ensures results match expectations.
When Professional Tools Make More Sense Than DIY
DIY duct cleaning tools have limits. When contamination is deep, widespread, or linked to health concerns, professional-grade equipment becomes necessary.
This is especially true for:
- Large villas or commercial spaces
- Systems unused for years
- Homes with allergy or respiratory sensitivity
Acting Before Contamination Becomes a Bigger Problem
Duct contamination often develops slowly and quietly. Over time, it can affect indoor air quality, increase strain on the AC system, and raise energy consumption. Bio On Air addresses these risks through proper assessment, correct tool selection, and verified cleaning methods that prioritize safety and effectiveness. Acting earlier helps prevent deeper contamination and avoids more complex interventions later. If you want to understand whether your ducts need professional attention, you can use the WhatsApp or Call button at the top right of this page to discuss your situation with our team.
Conclusion
Duct cleaning tools are not one-size-fits-all. The right choice depends on who is using them, the type of duct system, and the level of contamination. Manual tools may be enough for light DIY tasks, while drill-powered and pneumatic systems provide deeper cleaning when used correctly. Just as important as the tools themselves are safety practices, debris control, and verification methods.
Understanding these factors helps you avoid common mistakes that damage ducts or worsen contamination. Whether you choose DIY cleaning or professional service, knowing how tools work and how results should be verified gives you control, clarity, and confidence in protecting your indoor air quality.