The ac installation process is not just about placing a new unit and turning it on. A proper installation determines how efficiently your AC cools, how stable it runs over the years, how healthy your indoor air remains, and how much you spend on electricity and future repairs. Many problems people face with new AC systems—uneven cooling, high energy bills, frequent breakdowns, or early component failure—can be traced back to shortcuts taken during installation. This guide explains, step by step, what should happen from the moment the installation team arrives until the system is fully handed over, so you understand what good installation really looks like and why each stage matters.
Table of Contents
TogglePre-Installation Preparation: What Should Happen Before Any Tools Are Used
A professional ac installation process starts long before drilling, mounting, or connecting pipes. Preparation is where many mistakes are made, especially when installers rush to “get the job done.”
Proper Cooling Load Calculation Using Manual J Principles
One of the most critical pre-installation steps is calculating the correct cooling load for your space. This is often referred to as Manual J–based load calculation. While homeowners do not need to understand the formulas, the principle is simple: the AC capacity must match the actual cooling needs of the space.
A proper load calculation considers:
- Room size and ceiling height
- Insulation quality
- Window size, type, and orientation
- Heat generated by occupants and appliances
- Local climate conditions
Skipping this step often leads to oversizing or undersizing. An oversized AC cools too quickly, cycles on and off frequently, and fails to remove humidity properly. An undersized unit runs constantly, struggles to reach set temperature, and wears out faster. Both scenarios increase operating costs and reduce comfort.
Site Readiness Inside and Outside the Home
Before installation begins, the site should be checked for readiness. Indoors, this includes verifying wall strength, clearance for airflow, drain routing, and accessibility for future maintenance. Outdoors, the area for the condenser must be stable, well-ventilated, and protected from excessive heat buildup.
Common preparation checks include:
- Ensuring the indoor unit location allows even air distribution
- Confirming sufficient clearance around the outdoor unit
- Checking drainage slope for condensate removal
- Making sure the mounting surface is level and vibration-resistant
Ignoring site readiness often causes noise issues, water leakage, or reduced system efficiency later.
Electrical Capacity and Safety Checks
An AC system places significant load on the electrical system. Before installation, electrical capacity and safety must be verified.
This includes:
- Checking breaker size and wiring compatibility
- Ensuring proper grounding
- Verifying voltage stability
- Confirming compliance with local electrical codes
Installing an AC without confirming electrical readiness can lead to nuisance tripping, overheating wires, or long-term electrical hazards.
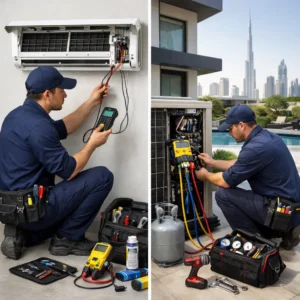
Arrival Day: How a Professional Installation Should Begin
When the installation team arrives, the process should follow a structured flow rather than a rushed setup.
The first steps typically include:
- Confirming the installation plan and unit specifications
- Protecting floors, furniture, and surrounding areas
- Reviewing indoor and outdoor unit placement
This stage sets expectations and ensures both installer and homeowner agree on what will be done.
Safe Recovery of Existing Refrigerant
If an old system is being replaced, the existing refrigerant must be recovered safely. This is a critical environmental and technical step in the ac installation process.
Professional recovery involves using proper recovery machines to remove refrigerant into approved containers. Venting refrigerant into the atmosphere is unsafe, illegal in many regions, and harmful to the environment.
Proper refrigerant recovery also protects technicians and prevents contamination of the new system.
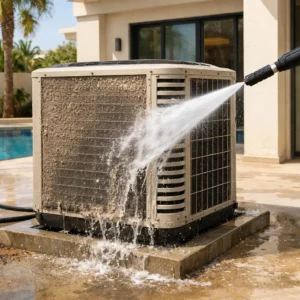
Outdoor Unit Placement and Leveling
The outdoor condenser unit is often overlooked, yet its placement has a direct impact on performance and longevity.
A professional installation ensures:
- The unit is placed on a stable, level base
- Airflow around the condenser is unobstructed
- Heat discharge is not trapped near walls or corners
- Vibration isolation pads are used where necessary
An unlevel or poorly placed outdoor unit can cause compressor stress, noise issues, and reduced efficiency over time.
Indoor Unit and Coil Matching
Proper matching between the indoor coil and the outdoor unit is essential. Mismatched components can reduce system efficiency and may even void manufacturer warranties.
During installation, the indoor coil must:
- Match the capacity and refrigerant type of the outdoor unit
- Be installed with correct orientation and airflow direction
- Allow easy access for future cleaning and servicing
Shortcuts at this stage often lead to uneven cooling, excessive condensation, or early component wear.
Line-Set Routing and Protection
The refrigerant line set connects the indoor and outdoor units. How it is routed and protected matters more than many people realize.
Professional line-set installation includes:
- Using the correct pipe diameter and material
- Avoiding unnecessary bends and sharp turns
- Proper insulation to prevent heat gain and condensation
- Secure fastening to avoid vibration damage
Poor line-set routing increases pressure drop, reduces efficiency, and can lead to refrigerant leaks over time.
Correct Joint Connection Methods
Refrigerant joints are among the most common failure points in AC systems. How these joints are made directly affects system reliability.
Professional installers use proper flaring or brazing techniques, depending on system design, and ensure joints are clean, tight, and properly sealed.
Rushed or poorly formed joints often lead to slow leaks that are difficult to detect until performance drops.
Quality-Critical Step: Nitrogen Purging During Brazing
This is one of the most skipped steps in low-quality installations. During brazing, nitrogen purging prevents oxidation inside the copper pipes.
Without nitrogen purging:
- Oxidation flakes form inside pipes
- These contaminants circulate in the system
- Expansion valves and compressors are damaged over time
Nitrogen purging keeps the internal surfaces clean and extends system life. Skipping this step may not show immediate issues, but it often leads to long-term reliability problems.
Quality-Critical Step: Deep Vacuum Evacuation with Micron Gauge
Another commonly skipped step is proper evacuation. A professional ac installation process includes deep vacuum evacuation to remove air and moisture from the system.
Proper evacuation involves:
- Using a high-quality vacuum pump
- Pulling vacuum to a deep micron level
- Verifying results with a micron gauge
Moisture inside the system reacts with refrigerant and oil, forming acids that damage internal components. Simply “running the pump for a few minutes” is not enough.
Micron gauge verification ensures the system is truly clean and dry before charging.
Charging the System Correctly
After evacuation, the system must be charged with the correct amount of refrigerant. This is not guesswork.
Professional charging considers:
- Manufacturer specifications
- Line-set length adjustments
- Operating pressures and temperatures
Overcharging or undercharging reduces efficiency, stresses the compressor, and shortens system lifespan.
Shortcuts vs Professional Installation Methods
Understanding the difference between shortcuts and professional methods helps explain why installation quality matters.
Common shortcuts include:
- Skipping load calculation
- No nitrogen purging
- Inadequate evacuation without micron verification
- Quick electrical connections without full safety checks
Professional methods include:
- Accurate load assessment
- Clean piping practices
- Verified evacuation and charging
- Systematic testing and documentation
These choices affect energy efficiency, inspection outcomes, warranty validity, and long-term operating costs. While professional installation may appear more involved, it reduces hidden costs over time.
System Testing and Performance Verification
Once installation is complete, the system should not be handed over immediately. Proper testing is essential.
Testing typically includes:
- Checking temperature drop across the coil
- Verifying airflow
- Confirming stable electrical readings
- Listening for abnormal noise or vibration
This ensures the system performs as designed under real operating conditions.
Thermostat Setup and User Guidance
The thermostat is the interface between you and your AC system. Incorrect setup can undermine even a perfect installation.
Professional handover includes:
- Setting temperature and mode correctly
- Explaining basic operation
- Advising on energy-efficient usage
This helps you avoid accidental misuse that increases energy consumption.
Warranty Registration and Documentation
After installation, warranty registration should be completed. This step is often forgotten but is critical for future protection.
Proper documentation includes:
- Installation records
- Model and serial numbers
- Warranty registration confirmation
Incomplete documentation can complicate future warranty claims.
Permits, Inspections, and Compliance
Depending on location and system type, permits and inspections may be required. A professional installation ensures compliance with applicable regulations.
This protects you from issues during property resale, inspections, or insurance claims.
Awareness of Rebates or Incentives
In some cases, compliant and efficient installations may qualify for rebates or incentives. While availability varies, professional installers are usually aware of applicable programs and can guide you accordingly.
System Handover: What You Should Receive
The final step in the ac installation process is system handover.
You should receive:
- Confirmation that testing is complete
- Basic operating instructions
- Maintenance recommendations
- Warranty and documentation details
This ensures you are informed, confident, and prepared to use the system correctly.
Conclusion
The ac installation process is a structured sequence of decisions and actions, not a single event. From proper load calculation and site preparation to quality-critical steps like nitrogen purging and deep vacuum evacuation, every stage affects comfort, efficiency, reliability, and long-term cost.
When installation is done professionally, the system runs more efficiently, lasts longer, and maintains healthier indoor air. When shortcuts are taken, problems may not appear immediately but often surface later as higher energy bills, repeated repairs, or early component failure. Understanding what should happen during installation empowers you to ask the right questions, recognize quality work, and protect your investment for years to come.