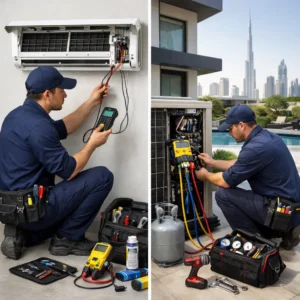
The keyword ac blower change usually comes up when your AC is running but airflow feels weak, uneven, noisy, or completely absent. This situation is stressful because the system may still consume electricity without delivering comfort, and replacing the wrong part can waste time and money. The goal of this guide is to help you understand when a blower motor truly needs replacement, how to approach the process safely, how to avoid common mistakes, and how to decide whether DIY or professional handling is the smarter option.
Table of Contents
ToggleWhat the AC Blower Actually Does and Why It Matters
The blower is responsible for moving conditioned air through the system and into your space. Even if the cooling components are working perfectly, a faulty blower will prevent proper airflow. This often leads to symptoms such as warm rooms, frozen coils, unusual noise, or rising electricity consumption.
Because airflow problems can be caused by multiple components, a blower motor should never be replaced based on assumption alone. Confirming the fault is the most important step before any ac blower change.
Confirmation Steps to Verify the Blower Motor Is Truly Faulty
Before replacing a blower motor, you need to confirm that the motor itself is the problem and not a related component. Many blower replacements fail because the real issue was misdiagnosed.
Check Electrical Power and Control Signals
First, verify that power is reaching the blower circuit. A blower that does not run may simply not be receiving a signal due to a control board or thermostat issue. If the motor never receives voltage, replacing it will not solve the problem.
Inspect the Capacitor
In many AC systems, a failed capacitor can prevent the blower from starting or cause it to hum without spinning. A weak capacitor can mimic a failed motor. Always test or rule out the capacitor before deciding on an ac blower change.
Check for Seized Bearings
Manually rotate the blower wheel (with power fully isolated). If it feels stiff, rough, or completely stuck, seized bearings may be the cause. In some cases, bearing failure means the motor is effectively non-repairable, but in others, debris or misalignment is the real issue.
Listen for Motor Noise Patterns
Grinding, screeching, or rhythmic rattling noises often indicate internal motor wear or bearing damage. A silent motor that smells burnt can indicate winding failure. These symptoms strongly support a true blower motor fault.
Understanding Blower Assembly Anatomy Before Disassembly
Before attempting any ac blower change, it is critical to understand what you are working with. A blower assembly consists of several interconnected parts that must be handled carefully.
Blower Housing
The housing holds the blower wheel and motor in alignment. Bending or misaligning the housing during removal can cause vibration and airflow issues after reinstallation.
Blower Wheel (Fan)
The blower wheel is mounted on the motor shaft and secured with a set screw. This wheel must be removed gently to avoid cracking or imbalance.
Set Screw
The set screw locks the blower wheel to the shaft. Stripping this screw is a common DIY mistake that can delay the job or damage the wheel.
Motor Mount and Brackets
These components keep the motor aligned. Improper reinstallation can cause noise and premature wear.
Wiring Connections
Blower motors may have multiple speed taps or connectors. Incorrect reconnection can cause incorrect rotation, overheating, or control errors.
Motor Compatibility and Selection Guidance
Choosing the wrong replacement motor is one of the most expensive mistakes during an ac blower change. Motors are not interchangeable just because they “fit.”
Match Electrical Specifications
Voltage, phase, and frequency must match exactly. A mismatch can cause immediate failure or unsafe operation.
Understand Motor Types
Common motor types include PSC (Permanent Split Capacitor) motors and ECM (Electronically Commutated Motors). ECM motors are more efficient but require compatible control signals. Replacing an ECM motor with a PSC type without system modification is not advised.
Check Horsepower and RPM
Incorrect horsepower or RPM can reduce airflow, overload the motor, or increase noise levels.
Verify Shaft Size and Rotation Direction
The shaft diameter, length, and rotation direction must match the original motor. Even small mismatches can prevent proper blower wheel alignment.
If you are unsure, professional guidance can prevent buying the wrong motor and repeating the process.
High-Risk Replacement Steps and Safety Emphasis
An ac blower change involves mechanical, electrical, and alignment risks. The following steps highlight where most damage occurs.
Power Isolation
Disconnect power at the breaker, not just the thermostat. Confirm zero voltage before touching any component.
Careful Removal
Support the blower assembly during removal to avoid bending the housing or damaging nearby coils.
Shaft Preparation
Clean and inspect the shaft before reinstalling the blower wheel. Debris or corrosion can cause imbalance.
Reinstallation Alignment
Ensure the blower wheel is centered and the set screw is properly tightened without over-torquing.
Wiring Awareness
Reconnect wires exactly as labeled. Incorrect wiring can damage the new motor instantly.
DIY Replacement vs Professional Service Value Comparison
Many people consider DIY for an ac blower change to save money. However, value is not only about upfront cost.
DIY Considerations
- High effort and time investment
- Risk of misdiagnosis or incorrect motor selection
- No labor warranty
- Higher chance of secondary damage
Professional Service Considerations
- Correct diagnosis before replacement
- Proper motor matching
- Safer installation procedures
- Warranty on workmanship
In many cases, professional handling provides higher reliability and peace of mind, especially for critical components like the blower.
Post-Replacement Troubleshooting Checklist
After completing an ac blower change, several issues may appear if something is misaligned or misconfigured.
Excessive Vibration
Often caused by misaligned blower wheel or unbalanced installation.
Incorrect Rotation
Results in reduced airflow. Verify wiring and motor direction settings.
Weak or Uneven Airflow
May indicate incorrect RPM, wheel positioning, or duct restrictions.
Overheating or Shutdown
Can be caused by incorrect capacitor, wiring, or motor mismatch.
Readiness Checklist Before Starting a Blower Change
Preparation prevents mid-job stoppages and reduces risk.
- Correct replacement motor confirmed
- Proper capacitor (if required)
- Screwdrivers, hex keys, and puller tools ready
- Camera or labels for wiring reference
- Clear workspace and adequate lighting
When Professional Support Becomes the Safer Choice
If diagnosis is uncertain, the motor type is complex, or the system is critical for daily operation, professional handling is often the safer route. At Bio On Air, blower-related issues are handled through structured inspection, correct motor matching, and safe replacement procedures designed to avoid repeat failures. Pricing is explained clearly based on the specific system and condition, and customers are informed before any work begins.
Conclusion
An ac blower change is not a simple swap of parts. It requires accurate diagnosis, correct motor selection, careful mechanical handling, and proper reinstallation to ensure reliable airflow and system efficiency. Replacing the blower without confirming related components like capacitors or bearings can lead to wasted effort and higher costs. Understanding the blower assembly, preparing the right tools, and knowing when to stop DIY attempts are key to avoiding damage.
Whether you choose to handle the replacement yourself or rely on professional support, the priority should always be safety, compatibility, and long-term reliability. A correctly executed blower change restores airflow, protects the system, and helps your AC perform as intended without recurring issues.